Introduction
This guide shows you how to set up an example Java project in GitHub Codespaces using the Visual Studio Code web client. It will step you through the process of opening the project in a codespace, and adding and modifying a predefined dev container configuration.
After you complete this tutorial, you'll be able to add a dev container configuration to your own repository, using either the VS Code web client or the VS Code desktop application.
For more information about dev containers, see "Introduction to dev containers."
Step 1: Open the project in a codespace
-
Sign in to GitHub.com, if you haven't already done so.
-
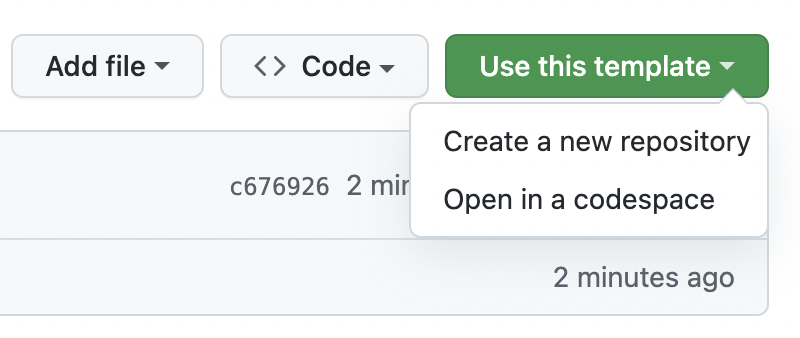
Click Use this template, then click Open in a codespace.

When you create a codespace, your project is created on a remote virtual machine that is dedicated to you. By default, the container for your codespace has many languages and runtimes, including Java. It also includes a set of commonly used tools such as Gradle, Maven, git, wget, rsync, openssh, and nano.
You can customize your codespace by adjusting the amount of vCPUs and RAM, adding dotfiles to personalize your environment, or by modifying the tools and scripts installed. For more information, see "Customizing your codespace."
GitHub Codespaces uses a file called devcontainer.json to configure the development container that you use when you work in a codespace. Each repository can contain one or more devcontainer.json files, to give you exactly the development environment you need to work on your code in a codespace.
On launch, GitHub Codespaces uses a devcontainer.json file, and any dependent files that make up the dev container configuration, to install tools and runtimes, and perform other setup tasks that the project requires. For more information, see "Introduction to dev containers."
Step 2: Add a dev container configuration
The default development container, or "dev container," for GitHub Codespaces will allow you to work successfully on a Java project like vscode-remote-try-java. However, we recommend that you configure your own dev container to include all of the tools and scripts your project needs. This will ensure a fully reproducible environment for all GitHub Codespaces users in your repository.
To set up your repository to use a custom dev container, you will need to create one or more devcontainer.json files. You can either add these from a predefined configuration template, in Visual Studio Code, or you can write your own. For more information on dev container configurations, see "Introduction to dev containers."
-
Access the Visual Studio Code Command Palette (Shift+Command+P / Ctrl+Shift+P), then start typing "add dev". Click Codespaces: Add Dev Container Configuration Files.

-
Click Create a new configuration.
-
In this example, the template repository from which you created the codespace already contains a dev container configuration, so a message is displayed telling you that the configuration file already exists. We're going to overwrite the existing configuration file, so click Continue.
-
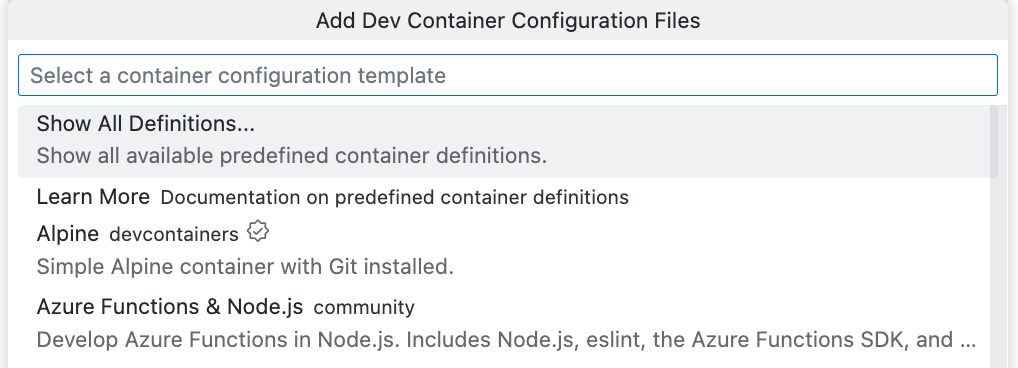
Click Show All Definitions.

-
Type
javaand click the Java option. Other options are available if your project uses particular tools. For example, Java & PostgreSQL.
-
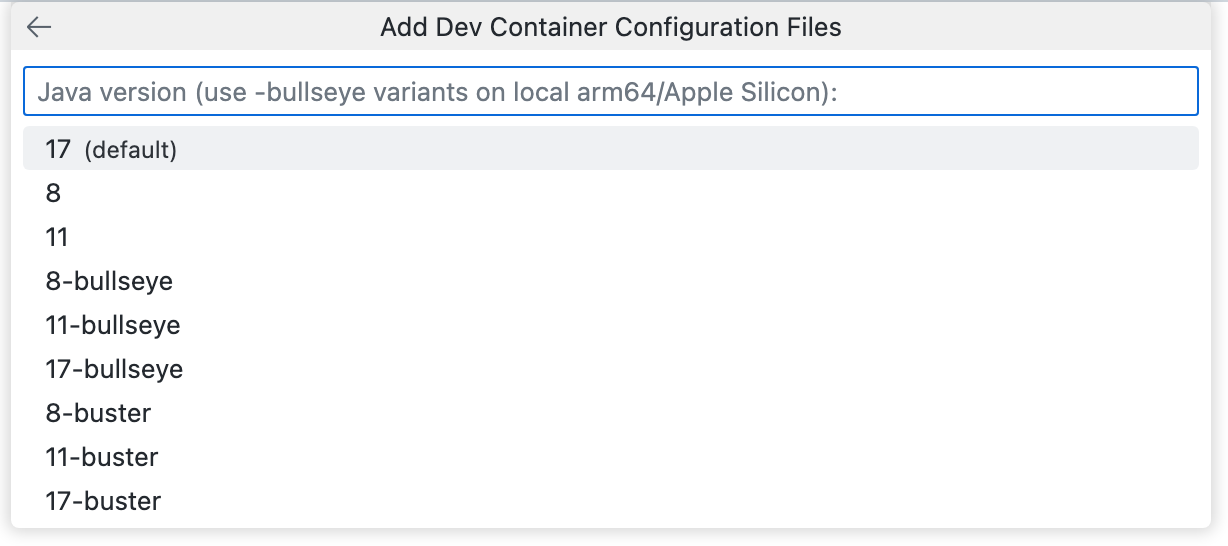
Choose the version of Java you want to use for your project. In this case, select the version marked "(default)."

-
Select the option to Install Maven and click OK.

-
A list of additional features you can install is displayed. We'll install Ant, the Java library and command-line tool for building applications. To install this feature, type
ant, selectAnt (via SDKMAN), then click OK.
-
A message is displayed telling you that the dev container configuration file already exists. Click Overwrite.
A
devcontainer.jsonfile is created and is opened in the editor.
Details of your custom dev container configuration
If you look in the Visual Studio Code Explorer you'll see that a .devcontainer directory has been added to the root of your project's repository containing the devcontainer.json file. This is the main configuration file for codespaces created from this repository.
devcontainer.json
The devcontainer.json file that you have added will contain values for the name, image, and features properties. Some additional properties that you may find useful are included but are commented out.
The file will look similar to this, depending on which image you chose:
// For format details, see https://aka.ms/devcontainer.json. For config options, see the
// README at: https://github.com/devcontainers/templates/tree/main/src/java
{
  "name": "Java",
  // Or use a Dockerfile or Docker Compose file. More info: https://containers.dev/guide/dockerfile
  "image": "mcr.microsoft.com/devcontainers/java:0-17",

  "features": {
    "ghcr.io/devcontainers/features/java:1": {
      "version": "none",
      "installMaven": "true",
      "installGradle": "false"
    },
    "ghcr.io/devcontainers-contrib/features/ant-sdkman:2": {}
  }

  // Use 'forwardPorts' to make a list of ports inside the container available locally.
  // "forwardPorts": [],

  // Use 'postCreateCommand' to run commands after the container is created.
  // "postCreateCommand": "java -version",

  // Configure tool-specific properties.
  // "customizations": {},

  // Uncomment to connect as root instead. More info: https://aka.ms/dev-containers-non-root.
  // "remoteUser": "root"
}
- name: You can name your dev container anything you want. A default value is supplied.
- image: The name of an image in a container registry (DockerHub, GitHub Container registry, or Azure Container Registry) that will be used to create the dev container for the codespace.
- features: A list of one or more objects, each of which references one of the available dev container features. Features are self-contained, shareable units of installation code and development container configuration. They provide an easy way to add more tooling, runtime, or library features to your development container. You can add features either within VS Code or in the
devcontainer.jsoneditor on GitHub. For more information, click either the Visual Studio Code or Web browser tab in "Adding features to a devcontainer.json file." - forwardPorts: Any ports listed here will be forwarded automatically. For more information, see "Forwarding ports in your codespace."
- postCreateCommand: Use this property to run commands after your codespace is created. This can be formatted as a string (as above), an array, or an object. For more information, see the dev containers specification on the Development Containers website.
- customizations: This property allows you to customize a specific tool or service when it is used for working in a codespace. For example, you can configure specific settings and extensions for VS Code. For more information, see "Supporting tools and services" on the Development Containers website.
- remoteUser: By default, you’re running as the vscode user, but you can optionally set this to root.
For a complete list of available properties, see the dev containers specification on the Development Containers website.
Additional dev container configuration files
If you are familiar with Docker, you may want to use a Dockerfile, or Docker Compose, to configure your codespace environment, in addition to the devcontainer.json file. You can do this by adding your Dockerfile or docker-compose.yml files alongside the devcontainer.json file. For more information, see "Using Images, Dockerfiles, and Docker Compose" on the Development Containers website.
Step 3: Modify your devcontainer.json file
With your dev container configuration added and a basic understanding of what everything does, you can now make changes to customize your environment further. In this example, you'll add properties that will:
- Run a command, after the dev container is created, to create a new file.
- Automatically install two VS Code extensions in this codespace.
-
In the
devcontainer.jsonfile, add a comma after thefeaturesproperty.JSON "features": { "ghcr.io/devcontainers/features/java:1": { "version": "none", "installMaven": "true", "installGradle": "false" }, "ghcr.io/devcontainers-contrib/features/ant-sdkman:2": {} },"features": { "ghcr.io/devcontainers/features/java:1": { "version": "none", "installMaven": "true", "installGradle": "false" }, "ghcr.io/devcontainers-contrib/features/ant-sdkman:2": {} }, -
Uncomment the
postCreateCommandproperty and change its value toecho \"This file was added by the postCreateCommand.\" > TEMP.md.JSONC // Use 'postCreateCommand' to run commands after the container is created. "postCreateCommand": "echo \"This file was added by the postCreateCommand.\" > TEMP.md",
// Use 'postCreateCommand' to run commands after the container is created. "postCreateCommand": "echo \"This file was added by the postCreateCommand.\" > TEMP.md", -
Uncomment the
customizationsproperty and edit it as follows to install the "Code Spell Checker" extension and the "Extension Pack for Java."JSONC // Configure tool-specific properties. "customizations": { // Configure properties specific to VS Code. "vscode": { // Add the IDs of extensions you want installed when the container is created. "extensions": [ "streetsidesoftware.code-spell-checker", "vscjava.vscode-java-pack" ] } }// Configure tool-specific properties. "customizations": { // Configure properties specific to VS Code. "vscode": { // Add the IDs of extensions you want installed when the container is created. "extensions": [ "streetsidesoftware.code-spell-checker", "vscjava.vscode-java-pack" ] } }
The devcontainer.json file should now look similar to this, depending on which image you chose:
// For format details, see https://aka.ms/devcontainer.json. For config options, see the
// README at: https://github.com/devcontainers/templates/tree/main/src/java
{
"name": "Java",
// Or use a Dockerfile or Docker Compose file. More info: https://containers.dev/guide/dockerfile
"image": "mcr.microsoft.com/devcontainers/java:0-17",
"features": {
  "ghcr.io/devcontainers/features/java:1": {
    "version": "none",
    "installMaven": "true",
    "installGradle": "false"
  },
  "ghcr.io/devcontainers-contrib/features/ant-sdkman:2": {}
},
// Use 'forwardPorts' to make a list of ports inside the container available locally.
// "forwardPorts": [],
// Use 'postCreateCommand' to run commands after the container is created.
"postCreateCommand": "echo \"This file was added by the postCreateCommand.\" > TEMP.md",
// Configure tool-specific properties.
"customizations": {
  // Configure properties specific to VS Code.
  "vscode": {
    // Add the IDs of extensions you want installed when the container is created.
    "extensions": [
      "streetsidesoftware.code-spell-checker",
      "vscjava.vscode-java-pack"
    ]
  }
}
// Uncomment to connect as root instead. More info: https://aka.ms/dev-containers-non-root.
// "remoteUser": "root"
}
-
Save your changes.
-
Access the VS Code Command Palette (Shift+Command+P / Ctrl+Shift+P), then start typing "rebuild". Click Codespaces: Rebuild Container.

Tip
You may occasionally want to perform a full rebuild to clear your cache and rebuild your container with fresh images. For more information, see "Rebuilding the container in a codespace." Rebuilding inside your codespace ensures your changes work as expected before you commit the changes to the repository. If something does result in a failure, you’ll be placed in a codespace with a recovery container that you can rebuild from to keep adjusting your container.
After the dev container is rebuilt, and your codespace becomes available again, the
postCreateCommandwill have been run, creating aTEMP.mdfile, and the two extensions will be available for use.
Step 4: Run your application
-
Run the application by pressing
F5. -
If a "toast" notification message is displayed at the bottom right corner of VS Code, asking whether you want to switch to standard mode, click Yes.

-
When the project files have been imported, click the Debug Console tab to see the program output.

Step 5: Commit your changes
When you've made changes to your codespace, either new code or configuration changes, you'll want to commit your changes. Committing configuration changes to your repository ensures that anyone else who creates a codespace from this repository has the same configuration. Any customization you do, such as adding VS Code extensions, will be available to all users.
For this tutorial, you created a codespace from a template repository, so the code in your codespace is not yet stored in a repository. You can create a repository by publishing the current branch to GitHub.
For information, see "Using source control in your codespace."
Next steps
You should now be able to add a custom dev container configuration to your own Java project.
Here are some additional resources for more advanced scenarios.